Bottom Linear Gradient  Lines image

Learn

Resources

Article

18 min

read

Build an Interactive Voice Menu with SignalWire and Node.js

Implement speech recognition so that your application will make customer interactions seamless and personalized.

SignalWire Team Headshot

SignalWire

In this article

Share

Angular Gradient Image

Build it free.

Create a space and ship your first call flow in minutes.

Subscribe

Speech recognition can make an Interactive Voice Response (IVR) menu faster and less frustrating because callers can speak naturally instead of memorizing keypad options. This guide walks through building an interactive voice menu with SignalWire and Node.js using the SignalWire Compatibility API, including running a local server with Express, exposing it publicly with ngrok, returning XML call instructions that gather input via speech or Dual-Tone Multi-Frequency (DTMF), and routing the call to different outcomes based on what the caller said or pressed.


Build an IVR with SignalWire and Node.js

As communications technology advances, more customers are expecting easier input options and menus when interacting with phone systems. Since we can’t use telepathy (yet), the next best thing is speech recognition.

Speech recognition software usually works using speech-to-text conversion, where spoken words will be translated into written commands, allowing humans to interact with machines through speech. With the help of natural language processing, voice recognition software analyzes audio input, extracting features such as phonemes, words, or sentences, and then employs sophisticated algorithms to accurately transcribe and interpret the spoken language.

Why use speech recognition?

In telephony, there are many ways that voice recognition can be used to build modern applications, such as virtual assistants, voice transcription services, or call center automation. For example, speech recognition adds a new level of convenience and accessibility to IVR systems. It allows callers to interact naturally by speaking to the system, eliminating the need for them to remember and press specific digits on their phones. With SignalWire, integrating speech recognition into your custom IVR or call flow is a breeze.

Getting started with speech recognition

Let’s explore how to use speech recognition with SignalWire and Node.js by walking through the code step by step. Whether you're looking to enhance customer support or streamline your sales process, this tutorial will guide you through the first steps of using voice recognition with SignalWire’s programmable Compatibility API.

Requirements

The programmable voice API uses HTTP requests to fetch XML instructions, so SignalWire knows what to run on your calls. You will need the following:

  • A SignalWire Space. If you don’t have one, you can sign up here and get $5 credit.

  • Node.js knowledge and a working environment. If you do not know how to code, check out our Call Flow Builder for a no-code/low-code solution instead.

  • Ngrok knowledge (or an equivalent) to make your server publicly accessible. If you have never used Ngrok, you can follow Ngrok’s Getting Started tutorial.

Starting Ngrok

In order for SignalWire to be able to reach our local environment, we need to start Ngrok. It will give us a public-facing URL, which SignalWire will use to receive XML instructions and return input results. To start ngrok we just need to run:

ngrok http 3000

ngrok http 3000

ngrok http 3000

ngrok http 3000

Take note of the URL Ngrok gives you, as we will use it shortly.

Setting up a SignalWire Phone Number

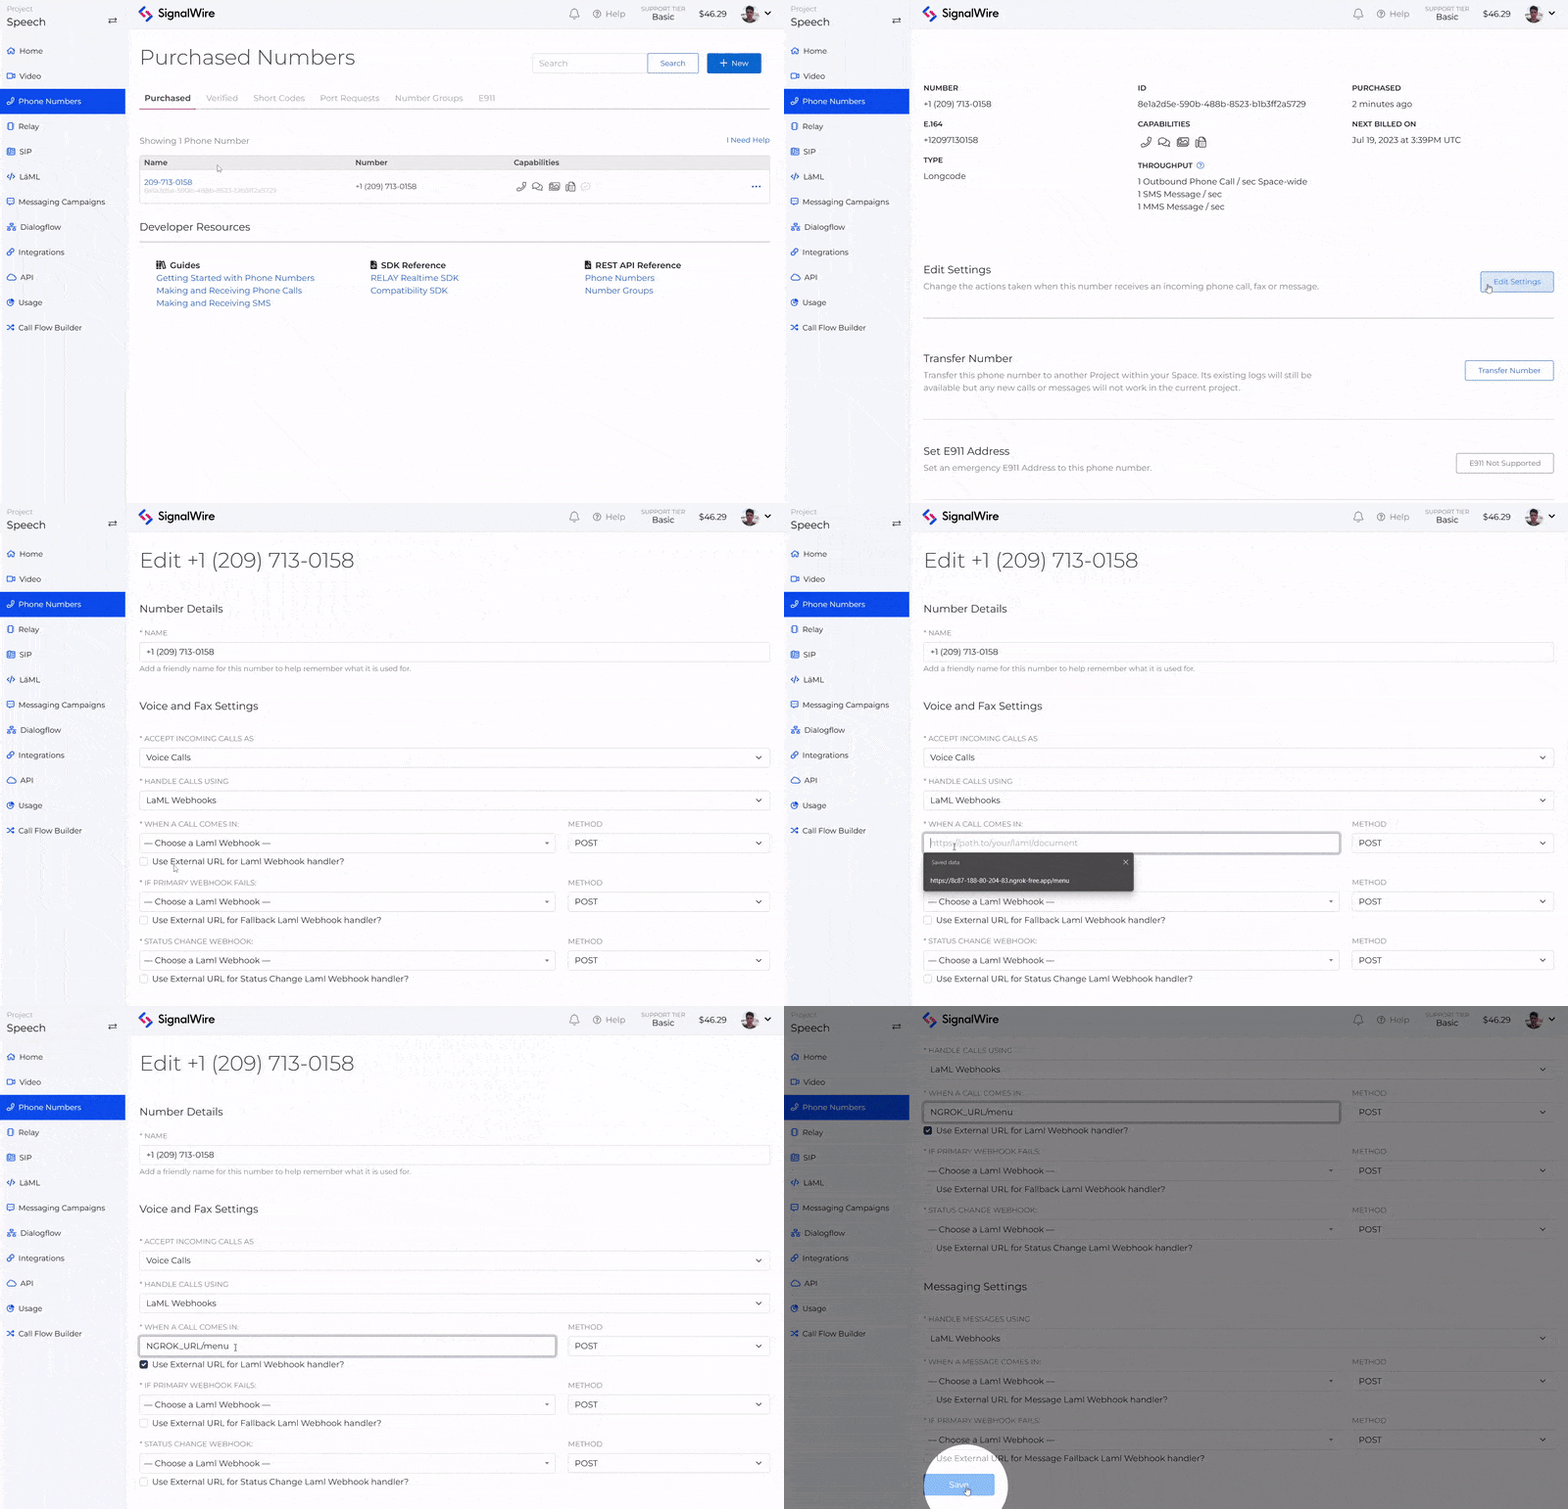
If you don’t have a phone number already, you can purchase one now by following these instructions, and then update its settings so calls are handled by your NGROK_URL/menu:
Installing dependencies

We will need to install Express and the SignalWire Compatibility API, so we can use its RestClient. To do so, we need to run:

npm install express @signalwire/compatibility-api

npm install express @signalwire/compatibility-api

npm install express @signalwire/compatibility-api

npm install express @signalwire/compatibility-api

Let's dive into the Node.js code now. You can create a speech.js file and start copying each bit over:

copy

01

02

03

04

05

06

07

08

09

10

11

12

const { RestClient } = require("@signalwire/compatibility-api")
const express = require("express")

const app = express()
const port = 3000
app.use(express.urlencoded({ extended: true }))

copy

01

02

03

04

05

06

07

08

09

10

11

12

const { RestClient } = require("@signalwire/compatibility-api")
const express = require("express")

const app = express()
const port = 3000
app.use(express.urlencoded({ extended: true }))

copy

01

02

03

04

05

06

07

08

09

10

11

12

const { RestClient } = require("@signalwire/compatibility-api")
const express = require("express")

const app = express()
const port = 3000
app.use(express.urlencoded({ extended: true }))

copy

01

02

03

04

05

06

07

08

09

10

11

12

const { RestClient } = require("@signalwire/compatibility-api")
const express = require("express")

const app = express()
const port = 3000
app.use(express.urlencoded({ extended: true }))

Here, we import the necessary libraries and create an Express application. We also set the port number for our server and enable URL-encoded form data parsing.

copy

01

02

03

04

05

06

07

08

09

10

11

12

app.post("/menu", (req, res) => {
    const response = new RestClient.LaML.VoiceResponse();

    const gather = response.gather({
        input: "speech dtmf",
        action: "/processInput",
        timeout: 5, 
        numDigits: 1
    });

    gather.say("Welcome to SignalWire! For Support, say Support or press 1, for Sales, say Sales or press 2.");
    
    response.say("We did not receive any input. Goodbye!");

    let instructions = response.toString();
    res.send(instructions);
});

copy

01

02

03

04

05

06

07

08

09

10

11

12

app.post("/menu", (req, res) => {
    const response = new RestClient.LaML.VoiceResponse();

    const gather = response.gather({
        input: "speech dtmf",
        action: "/processInput",
        timeout: 5, 
        numDigits: 1
    });

    gather.say("Welcome to SignalWire! For Support, say Support or press 1, for Sales, say Sales or press 2.");
    
    response.say("We did not receive any input. Goodbye!");

    let instructions = response.toString();
    res.send(instructions);
});

copy

01

02

03

04

05

06

07

08

09

10

11

12

app.post("/menu", (req, res) => {
    const response = new RestClient.LaML.VoiceResponse();

    const gather = response.gather({
        input: "speech dtmf",
        action: "/processInput",
        timeout: 5, 
        numDigits: 1
    });

    gather.say("Welcome to SignalWire! For Support, say Support or press 1, for Sales, say Sales or press 2.");
    
    response.say("We did not receive any input. Goodbye!");

    let instructions = response.toString();
    res.send(instructions);
});

copy

01

02

03

04

05

06

07

08

09

10

11

12

app.post("/menu", (req, res) => {
    const response = new RestClient.LaML.VoiceResponse();

    const gather = response.gather({
        input: "speech dtmf",
        action: "/processInput",
        timeout: 5, 
        numDigits: 1
    });

    gather.say("Welcome to SignalWire! For Support, say Support or press 1, for Sales, say Sales or press 2.");
    
    response.say("We did not receive any input. Goodbye!");

    let instructions = response.toString();
    res.send(instructions);
});

This route handles the initial voice menu interaction. It creates a new VoiceResponse object and adds the <gather> instruction so SignalWire can listen for user input. The input parameter specifies that the input can be received through speech or dual-tone multi-frequency signaling (DTMF). The action parameter defines where SignalWire will send the input results, and, by extension, where the input will be processed.

Inside the <gather> block, we use the say method to prompt the user to give us the desired input. If no input is received within the timeout period, the user will hear "We did not receive any input. Goodbye!" Should input be received, SignalWire will move on to the /processInput route.

While it may seem like the code is doing something, it’s really not. It’s actually using VoiceResponse to create valid XML instructions, so we can then return them to SignalWire, and SignalWire will actually interpret them and perform the designated actions on the call.

copy

01

02

03

04

05

06

07

08

09

10

11

12

app.post("/processInput", (req, res) => {
    console.log("DIGITS:", req.body.Digits);
    console.log("SPEECH:", req.body.SpeechResult);
    
    const response = new RestClient.LaML.VoiceResponse();

    if (req.body.Digits == "1" || req.body.SpeechResult == "support") {
        response.redirect("/support")
    } else if (req.body.Digits == "2" || req.body.SpeechResult == "sales") {
        response.redirect("/sales")
    }
    
    let instructions = response.toString();
    res.send(instructions);
});

copy

01

02

03

04

05

06

07

08

09

10

11

12

app.post("/processInput", (req, res) => {
    console.log("DIGITS:", req.body.Digits);
    console.log("SPEECH:", req.body.SpeechResult);
    
    const response = new RestClient.LaML.VoiceResponse();

    if (req.body.Digits == "1" || req.body.SpeechResult == "support") {
        response.redirect("/support")
    } else if (req.body.Digits == "2" || req.body.SpeechResult == "sales") {
        response.redirect("/sales")
    }
    
    let instructions = response.toString();
    res.send(instructions);
});

copy

01

02

03

04

05

06

07

08

09

10

11

12

app.post("/processInput", (req, res) => {
    console.log("DIGITS:", req.body.Digits);
    console.log("SPEECH:", req.body.SpeechResult);
    
    const response = new RestClient.LaML.VoiceResponse();

    if (req.body.Digits == "1" || req.body.SpeechResult == "support") {
        response.redirect("/support")
    } else if (req.body.Digits == "2" || req.body.SpeechResult == "sales") {
        response.redirect("/sales")
    }
    
    let instructions = response.toString();
    res.send(instructions);
});

copy

01

02

03

04

05

06

07

08

09

10

11

12

app.post("/processInput", (req, res) => {
    console.log("DIGITS:", req.body.Digits);
    console.log("SPEECH:", req.body.SpeechResult);
    
    const response = new RestClient.LaML.VoiceResponse();

    if (req.body.Digits == "1" || req.body.SpeechResult == "support") {
        response.redirect("/support")
    } else if (req.body.Digits == "2" || req.body.SpeechResult == "sales") {
        response.redirect("/sales")
    }
    
    let instructions = response.toString();
    res.send(instructions);
});

The /processInput route handles the input received from the user. It logs the received DTMF and speech input for debugging purposes.

Based on the user's input, the response is generated using the VoiceResponse object. If the input is "1" or "support," the user is redirected to the /support route. If the input is "2" or "sales," the user is redirected to the /sales route.

copy

01

02

03

04

05

06

07

08

09

10

11

12

app.post("/support", (req, res) => {
    const response = new RestClient.LaML.VoiceResponse();

    response.say("You've reached Support.")

    let instructions = response.toString();
    res.send(instructions);
});

app.post("/sales", (req, res) => {
    const response = new RestClient.LaML.VoiceResponse();

    response.say("You've reached Sales.")

    let instructions = response.toString();
    res.send(instructions);
});

copy

01

02

03

04

05

06

07

08

09

10

11

12

app.post("/support", (req, res) => {
    const response = new RestClient.LaML.VoiceResponse();

    response.say("You've reached Support.")

    let instructions = response.toString();
    res.send(instructions);
});

app.post("/sales", (req, res) => {
    const response = new RestClient.LaML.VoiceResponse();

    response.say("You've reached Sales.")

    let instructions = response.toString();
    res.send(instructions);
});

copy

01

02

03

04

05

06

07

08

09

10

11

12

app.post("/support", (req, res) => {
    const response = new RestClient.LaML.VoiceResponse();

    response.say("You've reached Support.")

    let instructions = response.toString();
    res.send(instructions);
});

app.post("/sales", (req, res) => {
    const response = new RestClient.LaML.VoiceResponse();

    response.say("You've reached Sales.")

    let instructions = response.toString();
    res.send(instructions);
});

copy

01

02

03

04

05

06

07

08

09

10

11

12

app.post("/support", (req, res) => {
    const response = new RestClient.LaML.VoiceResponse();

    response.say("You've reached Support.")

    let instructions = response.toString();
    res.send(instructions);
});

app.post("/sales", (req, res) => {
    const response = new RestClient.LaML.VoiceResponse();

    response.say("You've reached Sales.")

    let instructions = response.toString();
    res.send(instructions);
});

The /support and /sales routes handle the respective menu options. They create a new VoiceResponse object and use the say method to provide appropriate responses based on the user's selection. It’s completely up to you what you’d like to do with these routes. Here, we are using a simple example, but typically you might do something more, such as using Queues.

app.listen(port);
app.listen(port);
app.listen(port);
app.listen(port);

Finally, we start the server and listen for incoming requests on the specified port.

When you run this code and call your SignalWire phone number, you will hear the menu instructions, and depending on what you say on the call, different call flows will take place.

Congratulations! You have successfully built a custom IVR using SignalWire and Node.js! We encourage you to customize the menu prompts and responses by modifying the code according to your requirements.

SignalWire offers a wide range of features and capabilities that you can explore to enhance your communication systems further. Feel free to experiment and integrate SignalWire into your applications for seamless and efficient voice interactions by signing up for a free trial.

Explore developer.signalwire.com to learn more about SignalWire’s capabilities, and join our Community Discord to interact with the team. We can’t wait to see what you build!

Frequently asked questions

How do you build an IVR that accepts both speech and keypad input?

Use a gather step that enables both speech input and Dual-Tone Multi-Frequency (DTMF) digits, then route to a handler endpoint that reads the recognized speech and digits and branches accordingly.

What do you need to run a Node.js voice menu locally?

You need a Node.js environment, an Express server, and a public URL so SignalWire can reach your local endpoints. A common approach is using ngrok to expose your local server during development.

Why does the code return XML instructions instead of controlling the call directly?

The Node.js server generates valid XML instructions, and SignalWire executes those instructions on the live call, such as prompting, gathering input, and routing to the next step.

How do you connect a SignalWire phone number to your voice menu endpoint?

Configure the phone number so inbound calls are handled by your public URL, for example your ngrok URL plus the route that returns the initial menu instructions.

How should you handle silence or invalid input in an IVR?

Prompt once, then provide a clear fallback, such as replaying a simplified menu or ending the call cleanly, instead of looping indefinitely.

Bottom Linear Gradient  Lines image

The Communications Stack for What's Next

APIs built for speed. Infrastructure built for scale. AI built in from day one.

The Communications Stack for What's Next

APIs built for speed. Infrastructure built for scale. AI built in from day one.

The Communications Stack for What's Next

APIs built for speed. Infrastructure built for scale. AI built in from day one.

The Communications Stack for What's Next

APIs built for speed. Infrastructure built for scale. AI built in from day one.